Here’s the complete rundown of everything you need to know to create and promote your LinkedIn Events, with some help from PhantomBuster.
What is a LinkedIn event?
LinkedIn Events let you organize public online or in-person professional events. It’s a powerful yet underrated LinkedIn feature.
Whether you want to host an open webinar, or set up an in-person conference for your event attendees, LinkedIn is an ideal place to set it up and spread the word.
You can view LinkedIn’s event feed by searching “Events” in the search bar. Alternatively, you can also click “Discover more” from your home page panel, and select the “Events” tab from there.
What’s the difference between a LinkedIn Event and a LinkedIn Group?
A LinkedIn Event is a one-off gathering, whereas a LinkedIn Group is a community hub which you can connect with regularly.
Why should you use LinkedIn events?
If you’re wondering whether the LinkedIn Events feature is worthwhile, here’s why it could spell good news for your lead generation.
- There are no geographic constraints: Virtual events let you reach anyone, anywhere in the world, in just a few clicks.
- It’s cost-effective: LinkedIn Events are free to create, and you can invite your connections for free. You can pay for LinkedIn ads, but it’s completely optional.
- It’s the biggest professional network: If you want to reach a big target audience, then of all the social media platforms, LinkedIn is the number one place to start.
- You can measure the results: LinkedIn provides event analytics so that you can evaluate how it went.
So, if you’re organizing any work-related event, how about pairing it with a unique LinkedIn event page? Here’s everything you need to create a LinkedIn Event, promote it, and get people signing up in no time.
How to create an event on LinkedIn
First things first, let’s walk through the basics of creating LinkedIn Events.
Before you start designing your page, don’t forget to think about your target audience and what their priorities and pain points are. This will influence the type of event you create, as well as the topics you’ll talk about. If you need help getting to know your event attendees, check out our ebook on creating an ideal customer profile.
Once you’re clear about the purpose of your LinkedIn Event, and who it’s for, then you’re ready to start building. We’ll walk you through the admin tools to build your LinkedIn Event page. All you need is a LinkedIn account, and you’re all set.
Step 1: Create an event via your LinkedIn profile
It all starts on your LinkedIn feed. In the left column on your desktop screen, you’ll see the “Events” section. Click on this, and you’ll be redirected to the Events feed.
Here, you can select the “Create event” button to get started.
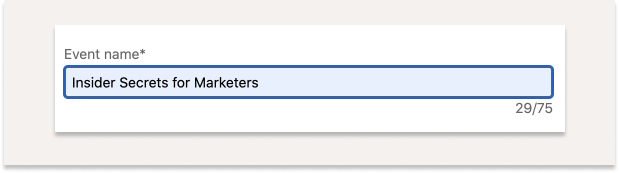
Step 2: Choose a name for your LinkedIn event
Now for a catchy event name to attract your event attendees. Remember, the first 24 characters are the most important, since LinkedIn’s interface never truncates them. Ensure this name is explicitly attractive to your audience. Marketing and branding are all about detail.
As you’re hosting a public LinkedIn Event and will want people to find it, you’ll also want to throw in a few keywords to your event name. This makes it easier for people using LinkedIn search to find your Event.
For example, instead of the name “Event #3”, you could write, “Event #3: LinkedIn Sales and Automation for Non-Tech People”.
Step 3: Add a cover image to your LinkedIn event
Your cover image will also display as the thumbnail of your LinkedIn Event, so it needs to stand out. When you share the event’s link on social media, this is what people will see, along with the first line of your event’s description.
So if your event is public and your goal is to get as many people as possible to come, make the banner intriguing from the get-go.
The default size of a LinkedIn Event cover image is 1776 x 444 px. If you have text, make sure it’s in the central third section of your banner. This way it will show nicely on the thumbnail as above.
If you want to preview your thumbnail, use a preview site like metatags.io.
Step 4: Identify whether it’s an online or offline LinkedIn event
Next, you need to identify the event type. You can choose between virtual events or offline events. If you choose an online event type, then you have 3 formats to choose from:
- A LinkedIn Audio Event: An audio-only format
- A LinkedIn Live: Lets you stream live events from a third-party tool
- An external event link: The event attendees click this to join
You can also select the date and time of your LinkedIn Event, as well as the timezone. Try to choose a timezone where most of your target audience is based.
Side note: LinkedIn no longer allows you to create a private event.
Step 6: Write an irresistible LinkedIn event description
Remember—good copy turns invitees into event attendees! Your LinkedIn Event description needs to be structured a bit like a sales landing page.
For example, you could follow the principles of the AIDA framework: Awareness, Interest, Desire, Action.
- Awareness: Catch attention with an unexpected fact or statement.
- Interest: Deliver your big idea.
- Desire: Let your reader imagine a world where this idea was possible.
- Action: Tell them how to get it (i.e., fill in the registration form for your event)!
You can also use influence levers to make your description even more influential.
- Mention famous guest speakers’ names and tag them
- Create a sense of scarcity, such as by having limited spaces available
- Share social proof and testimonials from previous happy attendees
- Create a sense of FOMO (fear of missing out)
In the space beneath your event description, you can also add any of your connections as speakers. Confirmed speakers will be shown in the LinkedIn Event details.
Step 7: Make your LinkedIn event “search-friendly”
You want to make your LinkedIn Event easy to find via a search. Not so much Google SEO (although Google does index public events), but mainly via LinkedIn-search SEO.
Sprinkle your event’s descriptions with keywords, hashtags, big names, brands, tools, URLs, and more.
This will help your LinkedIn Event to be seen by as many people as possible, and drive traffic to your event page.
Remember: LinkedIn events’ descriptions are limited to 5000 characters.
Step 8: Share your LinkedIn event
Once you’ve finished selecting your LinkedIn Event details, click “Next”. You will be invited to share your event as a post, to spread the word to other LinkedIn members.
Now is the time to push your event and build hype before the big day.
How to promote events on LinkedIn manually
Now that your LinkedIn Event is up and running, it’s time to share it with the world.
Step 1: Invite your connections
Bear in mind that you can only invite your LinkedIn connections to a LinkedIn event.
Invite your existing connections to a LinkedIn event as follows:
- Go to your event page.
- Click the “Invite connections” button.
- Use filters to find your event attendees more easily.
- Pick the guests you would like to invite.
- Send your invitations.
Can I invite guests in bulk with LinkedIn Events?
Unfortunately, this feature is not available with LinkedIn Events. But you can use 3rd-party tools such as the LinkedIn Event Inviter Flow to bulk invite people (more on this later).
Step 2: Post regularly (both on your page and the event page)
As soon as you create a LinkedIn Event, you’ll be invited to post about it on your personal profile. Use all the tricks in the book to give this post visibility:
- Mention key speakers
- Ask a question to generate engagement
- Ask people to mention someone who would benefit from the event
- Offer a bonus for early registrants
Ideally, you should schedule multiple LinkedIn posts until D-Day, reminding people that the event is coming up.
Build up excitement for attendees, too
Too often, marketers mistake the “attendance” numbers for actual attendees.
Your attendance rate is the proportion of people who actually attend the event they’ve signed up for. When this event is free or offers a chance of a replay, it’s common to see an attendance rate well below 50%.
To avoid this, we recommend posting on the LinkedIn Event page, too. Any news about the event, changes, last-minute things, and so on can become news for your event. You don’t need to worry about sharing too many details but focus on reminding the event attendees to save the date.
It’s also a way for people browsing through your event page to see that it’s an active hub and that they should join in to avoid missing out.
How to automatically promote events on LinkedIn
What if you’re short on time and you still want to nurture your target audience before the big day? At PhantomBuster, we have a few quick tools which can let you build hype for your LinkedIn Event on autopilot.
What is PhantomBuster?
PhantomBuster is a lead generation automation software, with over 100+ ready-made tools to handle your tasks automatically.
It operates via “Phantoms” (single automated actions) and “Flows” (sequences of automated actions).
If you don’t have an account already, you can sign up for a 14-day free trial to give it a test drive. Check out this video tutorial for an overview of how PhantomBuster works.
Invite people to your LinkedIn Event automatically
With the LinkedIn Event Inviter Phantom, you can send automatic invitations to your LinkedIn connections.
What if I don’t have many LinkedIn connections, yet?
Not to worry! You can use the LinkedIn Search to Lead Connection Flow to build your LinkedIn network automatically. It will extract the profiles from a targeted LinkedIn search URL, send them connection requests, and track who accepts. You’ll then be able to send event invitations to your new connections.
1. Open the Linkedin Event Inviter Flow
Open the Phantom and click “Use this Phantom”. You’ll then enter the Phantom setup.
2. Connect to LinkedIn
You can do this via your session cookie, using PhantomBuster’s Firefox or Chrome browser extension.
3. Share the LinkedIn Event
Copy/paste the URL of the LinkedIn Event you want to invite your connections to.
4. Share the LinkedIn contacts you want to invite
You can extract a list of your connections using the LinkedIn Connections Export Phantom, and then share the results in this step.
5. Choose your settings, then launch the Phantom
Specify how many profiles you’d like to invite per launch, along with whether you want the Phantom to run just once, or repeatedly. Then you’re ready to go!
Launch the Phantom, and it will invite your connections to your LinkedIn Event on autopilot.
Step 2: Auto-send a personalized message to your guests
With the LinkedIn Message Sender Phantom, you can automatically send personalized messages to your event attendees.
Here’s how it works.
1. Make a list of your event attendees
Open the LinkedIn Event Guests Export Phantom. Simply share the URL of your LinkedIn Event, and this Phantom will make a list of all the attendees. Easy peasy.
2. Send your guests a connection request
You won’t be able to send messages to these people unless they are your first-degree connections on LinkedIn. But that’s easily remedied!
Take the list of event guests that you collected in the previous step, and plug them into the LinkedIn Auto Connect Phantom.
LinkedIn limits you to sending 100 connection requests per week. To keep within this and automate efficiently, we recommend sending 20 connection requests per working day with this Phantom, spread out across several launches within working hours.
3. Auto-send messages about your event to new connections
Once people have accepted your request, you can message them about your LinkedIn Event. You can either use the LinkedIn Message Sender Phantom, or try our new Flow.
With the LinkedIn New Connection Welcome Message Flow, you can automatically send messages to new connections after they accept your request (with personalization tags and attachments)!
You can also choose conditions for sending the message, such as only sending it to people who haven’t contacted you yet. Watch this video tutorial to see how it works.