
LinkedIn InMail lets you message prospects you’re not connected to. Each InMail you send uses one credit from your monthly allocation. These credits are only available with LinkedIn Premium subscriptions.
Know how credits refresh, roll over, and refund so you can plan weekly outreach and avoid running out mid-campaign. Here’s how the credit system works and when to use it for sales outreach.
What are LinkedIn InMail credits?
LinkedIn InMail credits are units that allow premium users to send messages to people outside their network. Without these credits, you can only send regular messages to your direct connections.
Each credit equals one private message to someone you’re not connected with, up to the maximum number allowed by your plan. When you send an InMail, one credit is deducted from your account.
Use InMail credits when a connection request isn’t possible or goes unanswered. For sales, credits help you reach decision-makers who don’t accept connection requests.
InMail credits vs. free LinkedIn outreach: ROI comparison
Before spending InMail credits, test free alternatives. Connection requests often outperform cold InMail for most reps. Track your own baseline and compare before shifting budget.
| Method | Cost | Typical Use Case | Best For |
|---|---|---|---|
| Connection requests | Free | First touchpoint | Warm prospects, shared connections |
| LinkedIn InMail | Varies by plan | Direct outreach | Cold outreach to executives |
| Group messages | Free | Direct outreach | Industry-specific targeting |
| Content engagement | Free | Social warming strategy | Building rapport before outreach |
Nathan Guillaumin, PhantomBuster Product Expert: I’ve been helping users launch flows with social warming actions and noticing a big switch in results—from 10% acceptance rates to up to 50% because you’ve sufficiently warmed up your leads during some days or weeks where they’ve seen your name and profile.
Bottom line: Test free methods first. Reserve InMail credits for high-value prospects who don’t accept connection requests or respond to other approaches.
How many InMail credits each LinkedIn plan includes
LinkedIn premium subscription plans include different monthly credit allocations. As of October 2025, here’s what each plan offers:
| Plan | Monthly Credits | Effective Cost per Credit* | Primary Users |
|---|---|---|---|
| Premium Career | 5 | ~$12 | Job seekers |
| Premium Business | 15 | ~$4 | Professionals |
| Sales Navigator | 50 | ~$1.60 | Sales teams |
| Recruiter Lite | 30 | ~$2.50 | Recruiters |
*Calculated by dividing the monthly plan cost by the included credits
Credits refresh on your billing date and roll over for up to 90 days, with maximum accumulation limits based on your account type (typically three times your monthly allocation).
Important: LinkedIn doesn’t sell individual InMail credits. You can only get more credits by upgrading your plan or earning refunds when recipients respond to your messages.
Do InMail credits roll over or expire?
LinkedIn InMail credits have a specific lifecycle. They don’t last forever, but they don’t disappear immediately either.
Rollover period: Unused credits roll over for up to 90 days. This gives you a three-month window to use each credit before it expires.
Maximum accumulation: Each plan has a cap on how many credits you can store. You can typically accumulate up to three times your monthly allocation:
- Premium Career: Up to 15 credits
- Premium Business: Up to 45 credits
- Sales Navigator: Up to 150 credits
- Recruiter Lite: Up to 90 credits
When new monthly credits are added, any credits that would push your total above your plan’s maximum will expire, starting with the oldest ones.
How does LinkedIn’s InMail refund policy work?
LinkedIn offers a credit refund system that rewards effective communication. When someone responds to your InMail message within 90 days, you get that credit back.
This refund happens regardless of whether the response is positive or negative. Even a simple “No thanks” qualifies for a credit refund.
The refund system encourages quality outreach. By crafting messages that generate responses, you can effectively extend your credit usage beyond your monthly allocation.
Key refund conditions:
- The recipient must reply within 90 days of you sending the InMail message
- No refund if the recipient doesn’t respond
- No refund if the recipient deletes your message without responding
- The refund happens after a response
Strategy: Set a weekly target (e.g., 10 InMails), track responses, and recycle refunded credits into your top-tier accounts. A 50% response rate doubles your effective credit allocation.
What are InMail messages vs. free messages on LinkedIn?
You can message via standard messages (free) or InMail (premium).
Standard messages can be sent to:
- Your 1st-degree connections (people you’re directly connected with)
- Members with Open Profile settings
InMail messages let you contact members outside your network. Each InMail message sent consumes one InMail credit from your premium account.
The key difference is access. Standard messages limit you to people already in your network, while InMail opens communication with LinkedIn members beyond your connections.
Best practices for effective InMail messages on LinkedIn
Writing InMail messages that get responses helps you maximize your credits through LinkedIn’s refund policy. These strategies will improve your response rates.
1. Qualify prospects before using credits
Don’t waste credits on prospects you can reach for free. Use this qualification checklist:
- Can’t connect directly (profile shows “Follow” instead of “Connect”)
- High-value target (decision maker, budget authority)
- Strong personalization angle (recent activity, shared interests)
- Tried free methods first (connection request, content engagement)
2. Research for high-response messaging
Personalization consistently beats generic copy. Use these research sources:
- Recent LinkedIn posts and comments
- Company news and press releases
- Shared connections and mutual contacts
- Industry events and speaking engagements
Pro tip: Use PhantomBuster’s LinkedIn Search Export automation with AI Enricher to collect job titles, company info, and recent activity at scale. Prioritize the top accounts, then spend InMail credits on those.
3. Follow proven InMail templates
High-response InMails follow this structure:
Subject line: Specific + benefit (e.g., “Quick question about [Company]’s expansion”)
Message:
- Personal connection (1 line)
- Value proposition (1-2 lines)
- Simple ask (1 line)
- Easy next step (1 line)
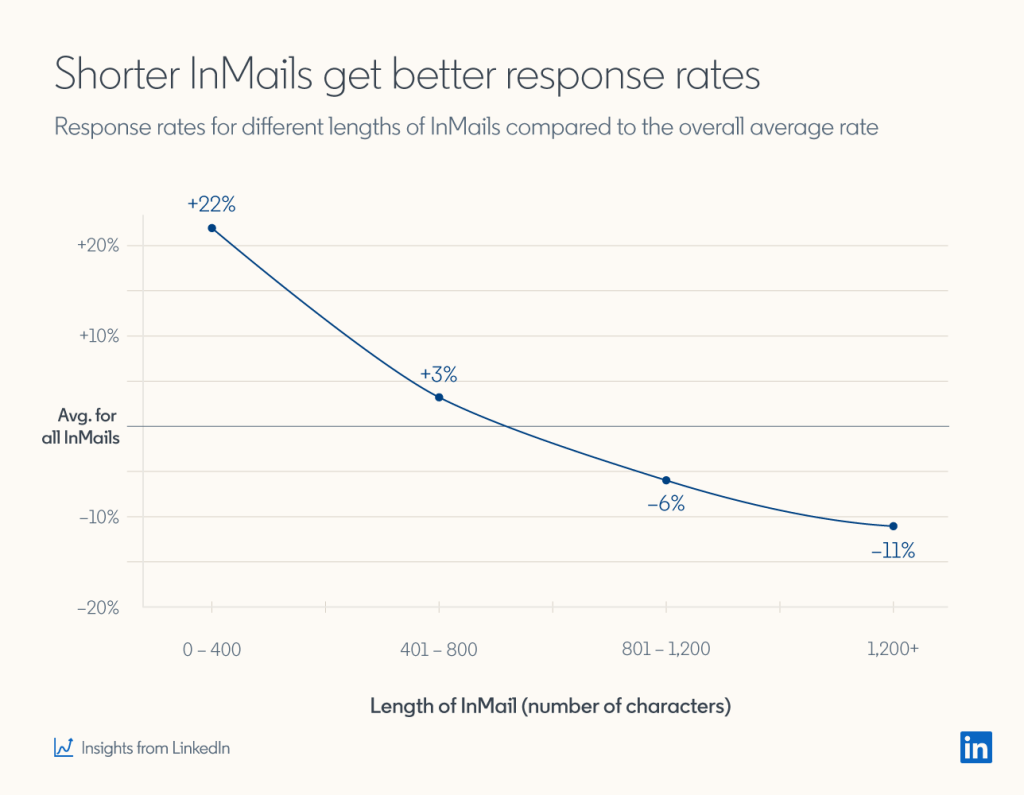
Aim for under 400 characters so it’s readable on mobile.
4. Include a relevant call to action
End every InMail message with a specific next step that’s easy for the recipient to take.
Examples of effective calls to action:
- “Would you be available for a 15-minute call this Thursday or Friday?”
- “Could you point me toward the right person who handles vendor partnerships?”
- “Would you like me to send over our case study on this topic?”
Avoid vague requests like “Let’s connect” or overwhelming asks that require significant time investment.
5. Follow up on your first message
Send one follow-up five to seven days later if there’s no reply. Keep it to one short line that adds new context.
Every follow-up costs an extra credit. That means sending a follow-up will cost you an additional credit. If the recipient responds to your follow-up, you will only get one credit back.
How to get more LinkedIn InMail credits
You can’t buy extra credits, but you can stretch them by upgrading your plan and earning refunds from replies.
1. Upgrade your account
The simplest way to get more credits is to upgrade to a higher-tier LinkedIn plan. Moving from Premium Business (15 credits) to Sales Navigator (50 credits) gives you over three times more monthly InMail message credits.
Sales Navigator adds filters like headcount growth and seniority. Use them to build tighter lists before spending credits.
2. Earn credit refunds through replies
The most cost-effective way to extend your credits is by earning refunds through responses. Focus on:
- Targeting the right people who are likely to engage
- Crafting personalized messages that invite replies
- Following up thoughtfully if you don’t get an initial response
A 50% response rate effectively doubles your monthly credits without additional cost within your billing cycle. For every InMail message, the recipient has up to 90 days to respond for you to get your credit back. Even if someone replies to a message you sent three months ago, you will still receive the refund.
3. Explore alternative outreach methods
Not every outreach requires an InMail message. Consider these alternatives that don’t use credits:
- Send personalized connection requests with a brief note (up to 300 characters)
- Engage with potential prospects’ content before reaching out
- Join industry groups where your prospects are active
- Look for “Open Profile” (a Premium setting where members accept messages without credits)
These approaches can help preserve your InMail credits for situations where direct outreach is most appropriate.
Where to view InMail credits balance on LinkedIn
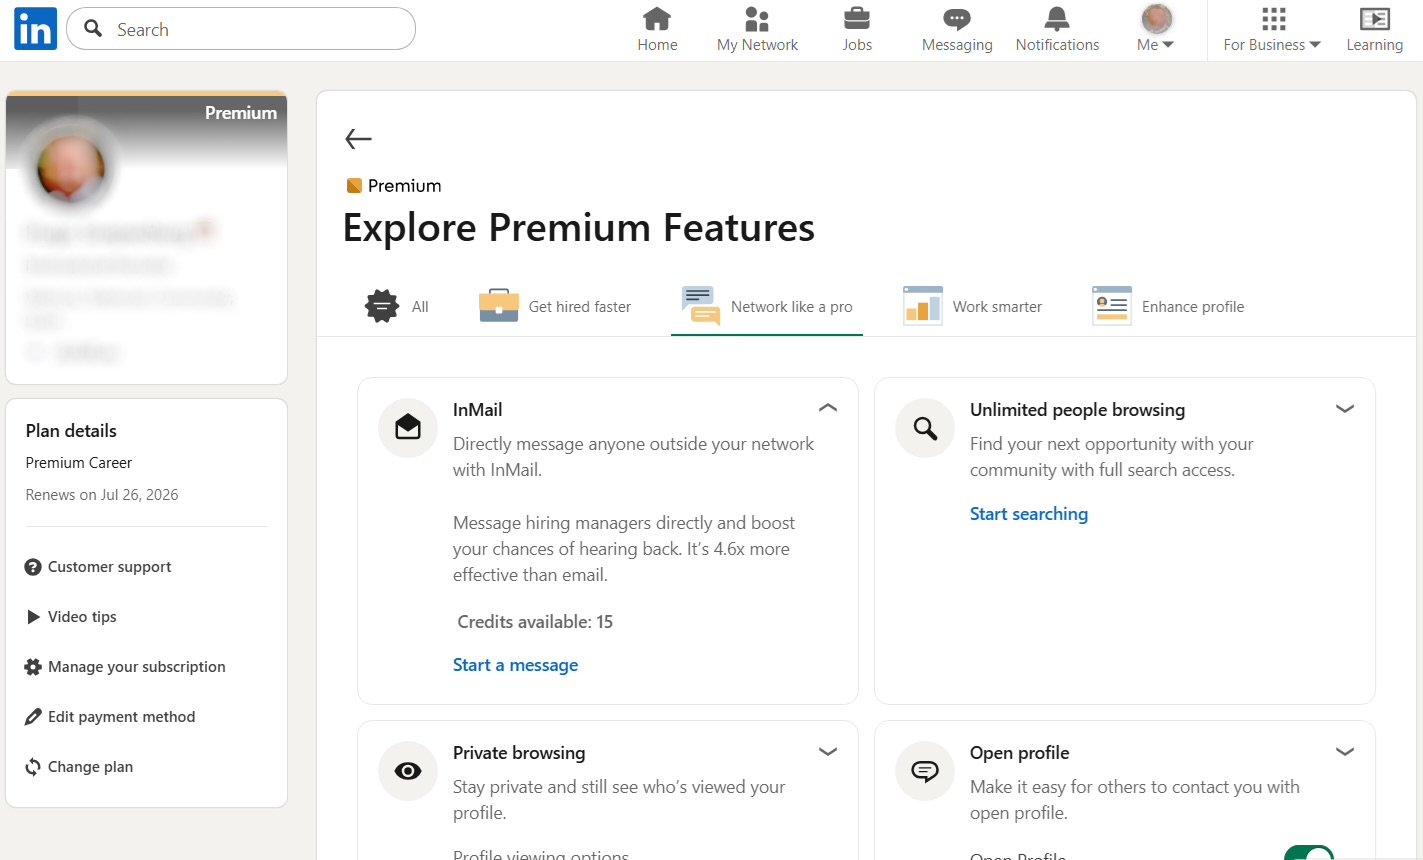
Finding your current InMail credit balance takes just a few clicks. Here’s where to look (UI as of October 2025):
- Log in to your LinkedIn account
- Click on your profile picture in the top right corner
- Select “Access My Premium” from the dropdown menu
- Look for the “InMail” section on your premium dashboard
You’ll see how many InMail credits you have left.
With any Sales Navigator subscription (Sales Navigator Core, Advanced, or Advanced Plus), you can find your InMail credits on the Sales Navigator Settings page.
Regularly checking your remaining number of InMail messages available helps you plan your outreach strategy and avoid running out of credits unexpectedly.
Scale LinkedIn outreach with PhantomBuster automations
PhantomBuster’s pre-built automations plug into your LinkedIn workflow to help you identify the right prospects before spending InMail credits. Here’s how to build a three-step process that makes every credit count:
Step 1: Find high-fit prospects. Use PhantomBuster’s LinkedIn Search Export automation to collect lead data from searches. Export job titles, company size, recent activity, and other signals that indicate buying intent.
Step 2: Enrich and validate. Run your list through the LinkedIn Profile Scraper automation to add verified emails and company data. This gives you multiple outreach channels and helps you prioritize accounts based on data completeness.
Step 3: Personalize at scale. Sync results to your CRM or Google Sheets via CSV, Zapier, or Make. Use the enriched data to craft personalized InMails for your top 20% of prospects, then reach the rest via email.
This workflow cuts list-building time and ensures you’re spending InMail credits on prospects who match your ideal customer profile. You’ll focus outreach on decision-makers who are most likely to respond.
Try PhantomBuster’s LinkedIn automations for free.
FAQs about LinkedIn InMail credits
Can I purchase additional InMail credits without upgrading my plan?
No. LinkedIn doesn’t sell individual credits. To get more, upgrade your plan or earn refunds from replies (within 90 days).
Does LinkedIn limit the daily number of InMail messages I can send?
LinkedIn doesn’t publish specific daily limits for InMail messages. However, sending many messages to LinkedIn members in a short period may trigger temporary restrictions. Space out your InMail messages and focus on quality over quantity to maintain account health.
How can I avoid violating LinkedIn policies when automating my outreach?
Use automation responsibly by respecting LinkedIn’s terms, pacing actions, and personalizing messages. PhantomBuster supports responsible workflows. Always follow LinkedIn’s rules.
What happens to my InMail credits if I downgrade my LinkedIn subscription?
When downgrading your subscription, any unused InMail credits above your new plan’s maximum limit will be lost. Credits within the new plan’s limit will remain available and continue following the standard 90-day expiration policy.
How long do recipients have to respond for me to get my InMail credit back?
Recipients have 90 days from when you send an InMail message to respond in order for you to receive a credit refund. Any response within this timeframe qualifies, regardless of whether the response is positive or negative.